

web Components
web components 是h5的一个新特性 他描述的是一个全新的web组合 : 自定义元素 shadow Dom 和 html模版
- 自定义元素。在html基础标签外去拓展自定义标签元素
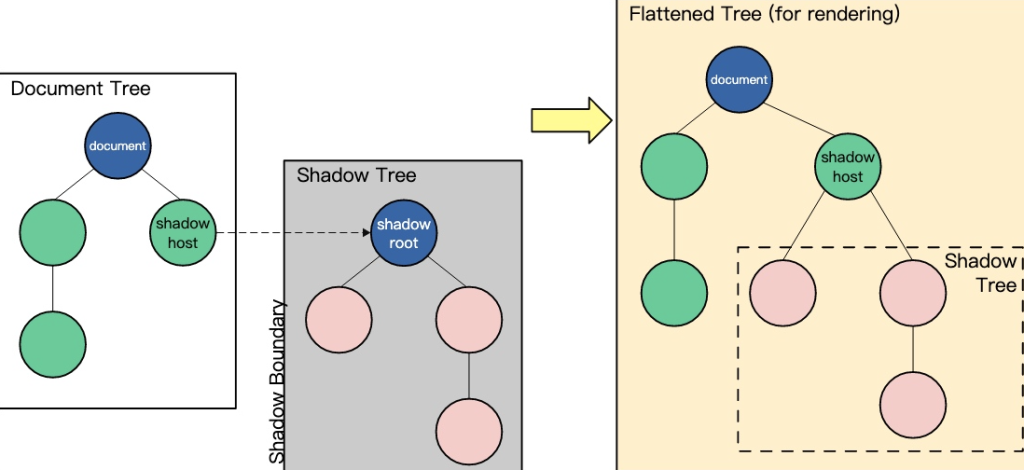
- Shadow Dom 主要用于Shadow Dom 的内容与外层Document Dom隔离
- HTML 模板 使用template来自定义组件模板 使用slot作为插槽
Custom Elements
如何创建一个CustomELement
https://developer.mozilla.org/zh-CN/docs/Web/API/Web_components/Using_custom_elements
创建一个最基本的`Custom Element`
class CustomButton extends HTMLElement {

  constructor() {

    super();

    let value = this.getAttribute("value");

    // 可以直接放入到innerHTML中

    // this.innerHTML = `<button>custom-button ${value}</button>`

    // 也可以通过appendChild的方式添加元素对象

    let btn = document.createElement("button");

    btn.innerHTML = `custom-button ${value}`;

    btn.addEventListener('click', () => {

      this.setAttribute("name", "test");

      this.setAttribute("value", 89);

    })

    this.appendChild(btn);

  }

  // 当 custom element首次被插入文档DOM时,被调用

  connectedCallback() {

    console.log("connectedCallback");

  }

  // 当 custom element从文档DOM中删除时,被调用

  disconnectedCallback() {

    console.log("disconnectedCallback");

  }

  // 当 custom element增加、删除、修改自身属性时,被调用

  attributeChangedCallback(name, oldValue, newValue) {

    console.log("attribute", name, oldValue, newValue);

  }

  // 声明需要监听的属性名,只有这些属性变化时才会触发attributeChangedCallback

  static get observedAttributes() {

    return ["name", "url", "value"];

  }

}

//参数一:自定义元素名,格式有要求:短线连接的字符串

//参数二:自定义元素构造器

//参数三:可选,含有 extends 属性的对象。指定所创建的元素继承自哪个内置元素,可以继承任何内置元素

window.customElements.define("custom-button", CustomButton);
界面使用
HTML
<!DOCTYPE html>

<html lang="en">

  <body>

    <button>点击</button>

    <custom-button

      name="app-button"

      url="www.baidu.com"

      value="90"

    ></custom-button>

  </body>

  <script src="test.js"></script>

  <script>
     // 要注意,写在这里是整个自定义元素的事件,也就是说,自定义元素里面的每一个元素,都会触发click事件
    const customButton = document.querySelector("custom-button");
    customButton.addEventListener("click", function (e) {

      this.setAttribute("name", "test");

      this.setAttribute("value", 99);

    });

  </script>

</html>
Shadow DOM
https://developer.mozilla.org/zh-CN/docs/Web/API/Web_components/Using_shadow_DOM
shadow Dom是 `Web components` 的一个重要属性是封装——可以将标记结构、样式和行为隐藏起来,并与页面上的其他代码相隔离,保证不同的部分不会混在一起,可使代码更加干净、整洁。其中,Shadow DOM 接口是关键所在,它可以将一个隐藏的、独立的 DOM 附加到一个元素上。【内外部隔离】
JSX
class CustomButton extends HTMLElement {
constructor() {
super();
let btn = document.createElement("button");
btn.innerHTML = `custom-button ${value}`;
//其他代码省略只保留关键代码...
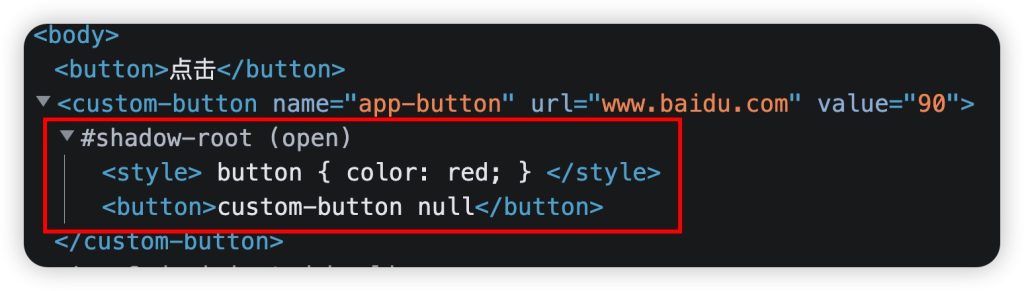
//创建Shadow DOM时,可以选择open或closed模式,
//close会对外部DOM隐藏shadowRoot,这可以防止其他脚本对DOM的以外操作
//但是也会阻止爬虫看到里面的内容,除非有特殊需求,建议默认open
this.attachShadow({ mode: "open" });
//这里的样式,只会作用域当前的shadowRoot中,不会影响到外部的DOM
this.shadowRoot.innerHTML = `
<style>
button {
color: red;
}
</style>
`;
this.shadowRoot.appendChild(btn);
}
//其他代码省略只保留关键代码
}
HTML模板
https://developer.mozilla.org/zh-CN/docs/Web/API/Web_components/Using_templates_and_slots
HTML
<template id="add-template">
  <input type="text">
  <button>新增</button>
</template>
JS
JavaScript
class CustomButton extends HTMLElement {

  constructor() {

    super();

    let value = this.getAttribute("value");

    let templateEle = document.getElementById("add-template");

    let cloneEle = templateEle.content.cloneNode(true);

    cloneEle.querySelector("input[type='text']").value = `${value}`;

    let btn = document.createElement("button");

    btn.innerHTML = `custom-button ${value}`;

    btn.addEventListener('click', () => {

      this.setAttribute("name", "test");

      this.setAttribute("value", 89);

    })

    this.attachShadow({ mode: "open" });

    this.shadowRoot.innerHTML = `

      <style>

        button {

          color: red;

        }

      </style>

    `;

    this.shadowRoot.appendChild(btn);

    this.shadowRoot.appendChild(cloneEle);

  }

}
还能使用`slot`插槽
HTML
<template id="add-template">

  <slot name="title"></slot>

  <input type="text">

  <button>新增</button>

</template>

<custom-button

  name="app-button"

  url="www.baidu.com"

  value="90"

>

  <div slot="title">

    <h2>新增</h2>

  </div>

</custom-button>
试着写一个Demo
JavaScript
class ImageBox extends HTMLElement {

  constructor() {

    super();

    this.render();

  }

  render() {

    let url = this.getAttribute('url');

    let title = this.getAttribute('title');

    let price = this.getAttribute('price');

    this.attachShadow({ mode: 'open' });

    const imageBoxTemplate = document.getElementById('image-box-template');

    const imageBoxContent = imageBoxTemplate.content.cloneNode(true);

    imageBoxContent.querySelector("img").setAttribute('src', url);

    imageBoxContent.querySelector("div.title").innerHTML = title;

    imageBoxContent.querySelector("div.price").innerHTML = `¥${price}`;

    imageBoxContent.querySelector("div.action").addEventListener('click', (e) => {

      let target = e.target;

      if (target.classList.contains('primary')) {

        alert("预定成功")

      }

      else {

        alert("加入购物车成功")

      }

    });

    this.shadowRoot.appendChild(imageBoxContent);

  }

}

window.customElements.define('image-box', ImageBox);
HTML
<!DOCTYPE html>

<html lang="en">

  <head>

    <meta charset="UTF-8" />

    <meta http-equiv="X-UA-Compatible" content="IE=edge" />

    <meta name="viewport" content="width=device-width, initial-scale=1.0" />

    <title>Document</title>

    <style>

      .content{

        display: flex;

        flex-wrap: wrap;

      }

      .btn{

        display: inline-block;

        padding: 6px 12px;

        background-color: #ccc;

        border: 1px solid transparent;

        border-radius: 5px;

        color: #fff;

        text-decoration: none;

        font-size: 14px;

        line-height: 1.42857143;

        cursor: pointer;

      }

      .btn:hover{

        background-color: #286090;

        border-color: #204d74;

      }

      .primary{

        background-color: #409eff;

      }

      .success{

        background-color: #67c23a;

      }

    </style>

  </head>

  <body>

    <template id="image-box-template">

      <style>

        .image-box {

          width: 200px;

          height: 200px;

          border: 1px solid #ccc;

          margin: 10px;

          padding: 10px;

          box-sizing: border-box;

          transition: all 0.5s;

        }

        .image-box:hover {

          box-shadow: 3px 3px 3px rgba(0, 0, 0, 0.3);

        }

        .image-box .img {

          width: 100%;

          height: 100%;

          transition: all 0.5s;

        }

        .image-box .img:hover {

          transform: scale(1.05, 1.05);

        }

        .image-box .title {

          font-size: 20px;

          font-weight: bold;

          margin: 10px 0;

        }

        .image-box .content {

          font-size: 16px;

          color: #666;

        }

      </style>

      <div class="image-box">

        <img class="img" src="" alt="" />

        <div class="title"></div>

        <div class="price"></div>

        <div class="action">

          <slot name="btn-action"></slot>

        </div>

      </div>

    </template>

    <div class="content">

      <image-box

        url="./images/奥利奥奶茶.jpeg"

        title="奥利奥奶茶"

        price="18"

      >

        <button slot="btn-action" class="btn primary">预定</button>

      </image-box>

      <image-box

        url="./images/奥利奥蛋糕.jpeg"

        title="奥利奥蛋糕"

        price="20"

      >

        <button slot="btn-action" class="btn success">购买</button>

      </image-box>

    </div>

  </body>

  <script src="index.js"></script>

</html>
发表回复